Simforge Mark-1 Dark Edition Pedals
Simforge is a relatively new player who entered the world sim racing scene by accident. In 2019, the in India-based Simforge started with an idea. Namely; making sim racing affordable for the “normal” sim enthusiasts in India. Due to high import costs, including shipping and extra taxes, brands such as Heusinkveld and Asetek are virtually unaffordable for the average sim racer there. With this they saw an opportunity at Simforge and decided to develop a pedal set in their own country for an affordable price that is a lot of “Bang for your buck”. So a lot of work was put in a concept that was tested by professional drivers before it was released. After 2 years it finally happened and the Simforge Mark-1 pedals saw the light of day for the first time. However, these pedals unexpectedly became such a success that there was also a lot of interest from outside of India to get hold of these pedals. Meanwhile, the Simforge Mark-1 is available worldwide and there are even plans to open a distribution location in Europe so that these pedals will also be available here at an even more competitive price.
Because the developments for their product do not stand still and they are constantly improving, new reviewers are asked for each upgrade to provide their feedback on the current product. This time it is our honor to give our opinion about this pedal set and we certainly won’t let ourselves be asked twice. It is with great enthusiasm that we receive the Simforge Mark-1 Dark Edition to take a good look at it.
At the time of writing, the Mark-1 pedals are for sale in the webshop for an amount of €361.73. The Simforge Mark-1 Dark Edition has an additional price compared to the original, which brings them to an amount of € 398.00. Please note, these are amounts without shipping costs and any import costs. The total final price for these pedals can therefore differ per country. If you are only interested in the 2 pedals or 3 pedals without a baseplate, there are also options for this in their webshop.
Packaging & Contents
After having made half a world trip from India to the Netherlands in 5 days, the Simforge Mark-1 pedals were delivered to our door by DHL. The box we receive is a standard brown box of quite a large size. Entirely in line with the approach to keep everything as affordable as possible, we do not find a nice shiny product box in this box, but a cleverly designed compartment pattern in which the pedals are neatly stored. The first thing you notice is that everything is well wrapped in bubble wrap for maximum protection. Everything is also tightly packed to maximize the space in the box but still have enough room to absorb any bumps during transport.
A box in which everything is tightly packed, but still has a decent size of 37 x 37 x 30 cm, must of course have a lot inside of it. And that is true, especially when you consider that the baseplate of this pedal set also consists of aluminum profiles. In the box we find on top, under 2 Simforge stickers, a thickly packed red plate for the baseplate. The box also contains 1 large 120×40 profile, 2 short 40×40 profiles with end cap and six corner pieces for the aluminum profiles. All these parts are to assemble the baseplate for the pedals. All bolts and sliding nuts, with which everything must be assembled, are together in a small cardboard box that can also be found in the large box.
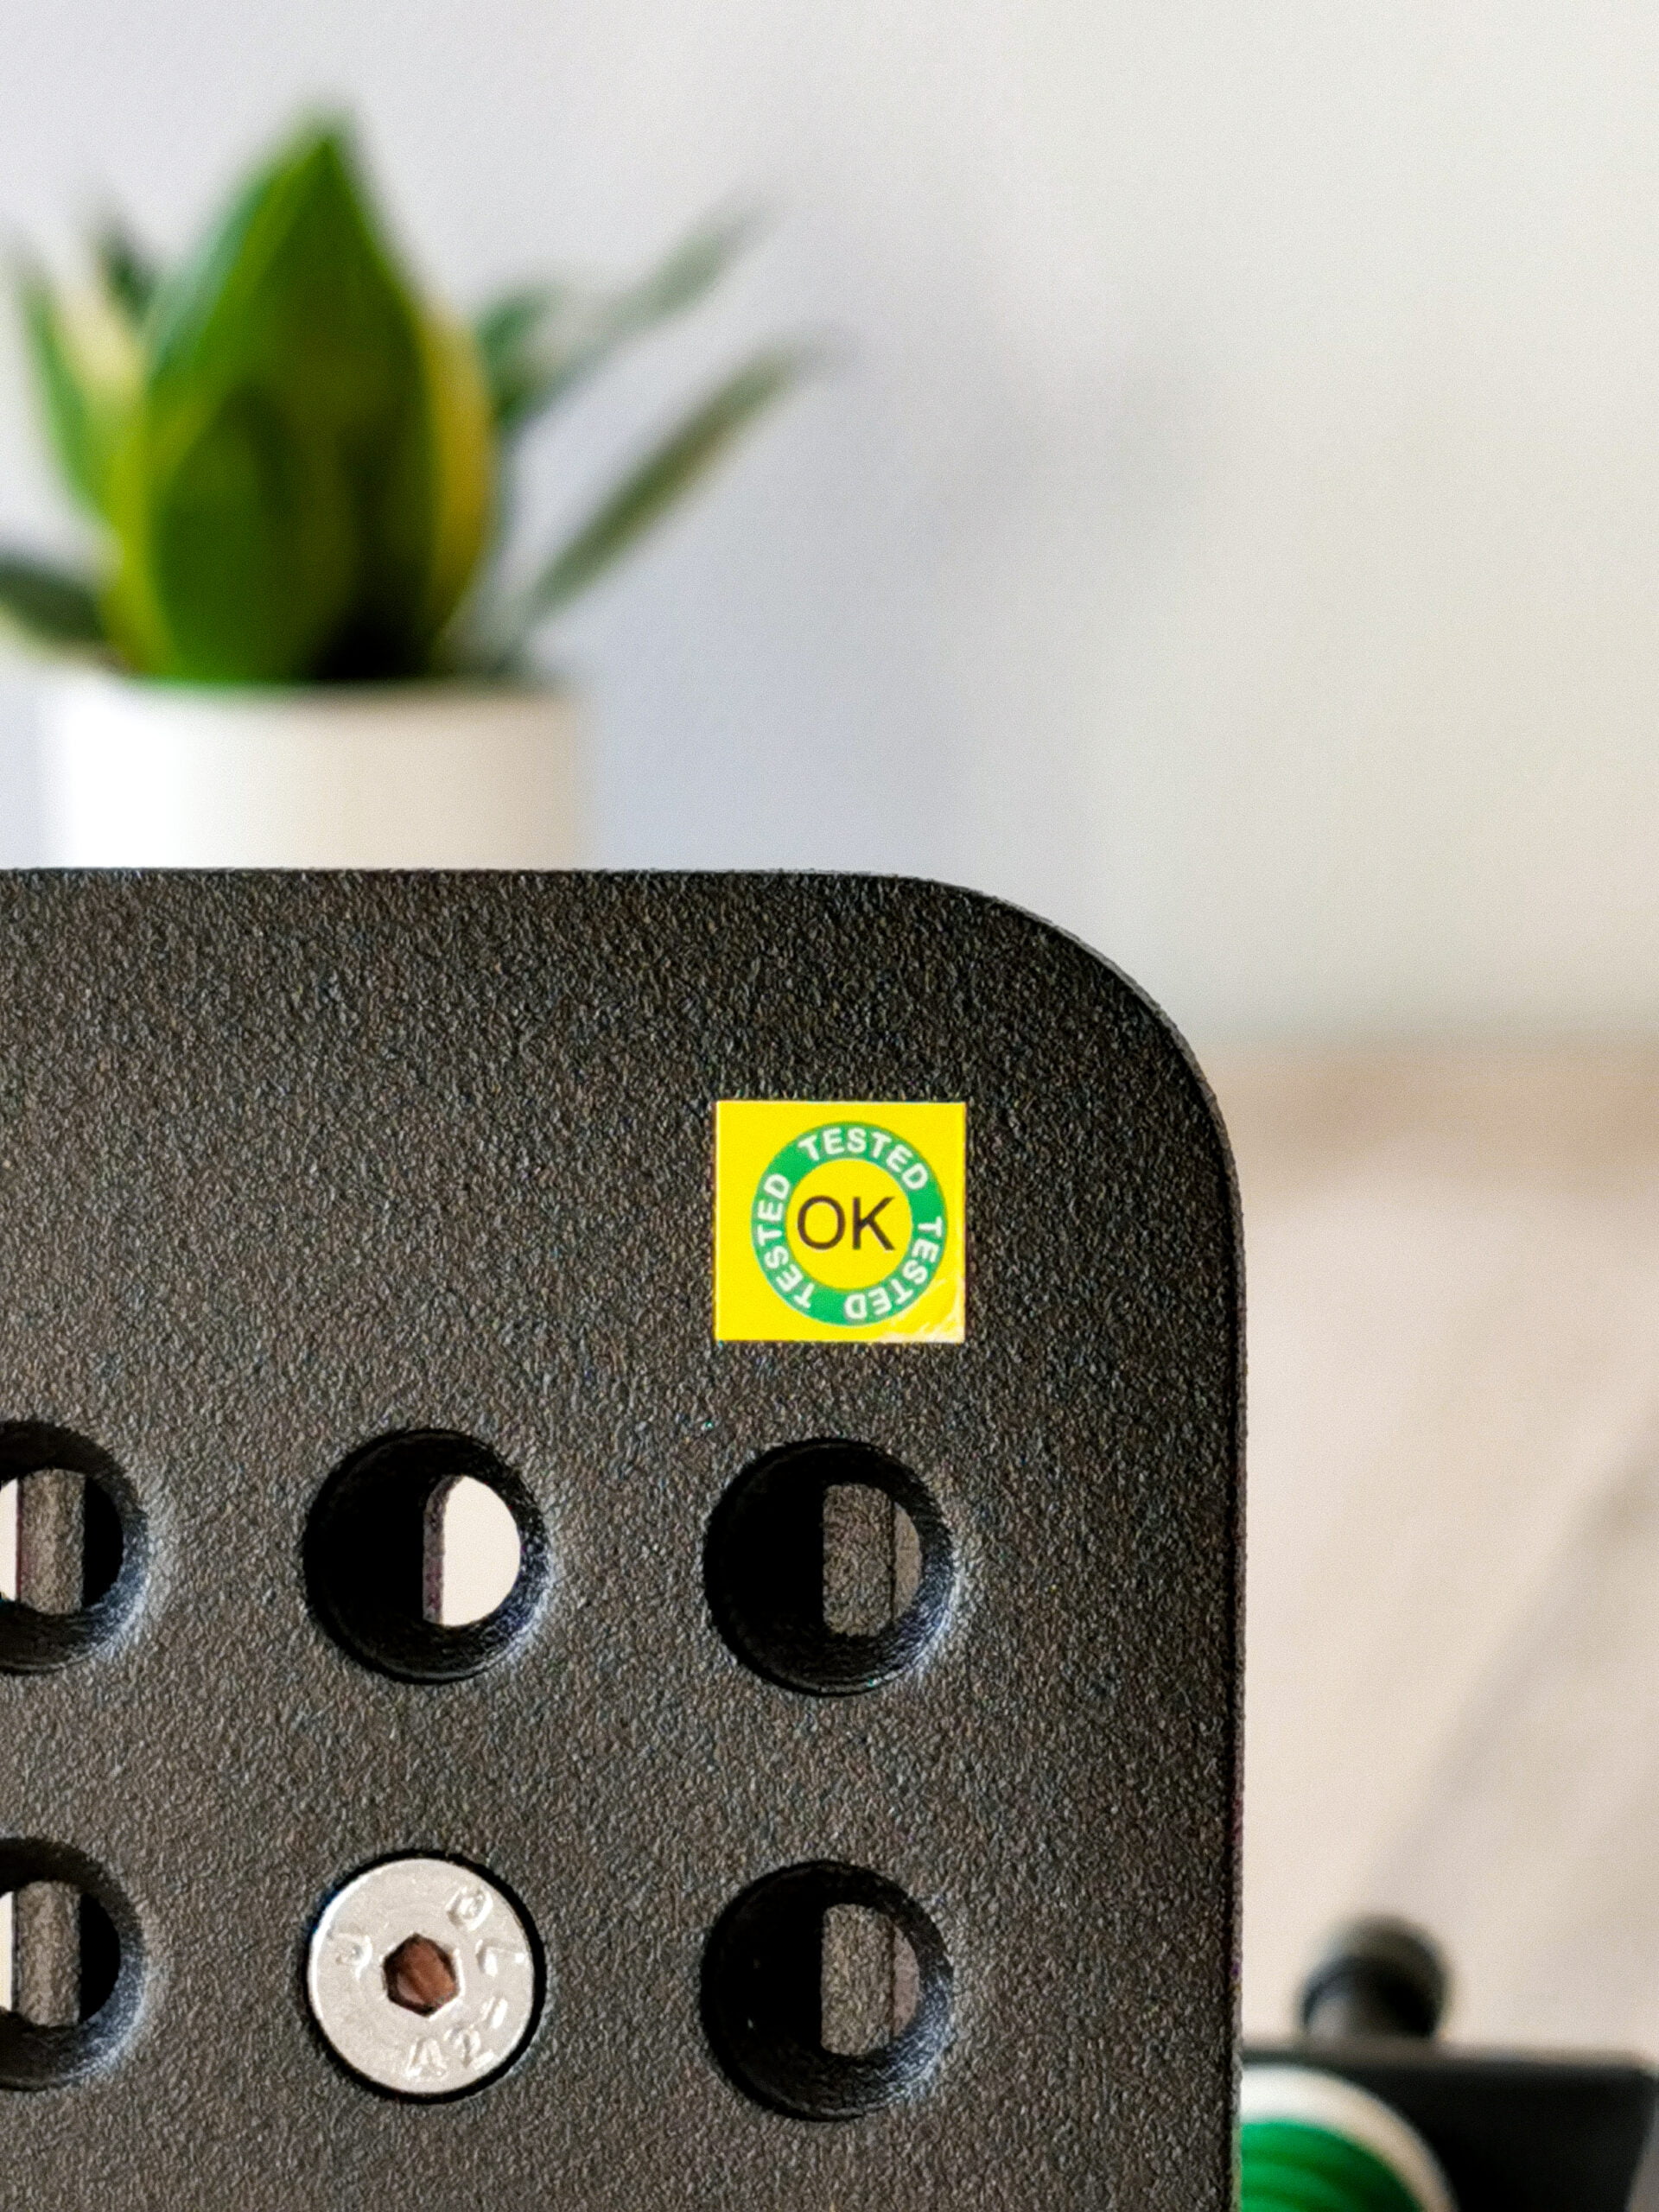
Furthermore, the box also contains the pedals themselves. Piece by piece we pull the accelerator, brake pedal and clutch pedal out of the preformed compartments in the box. Each pedal is well wrapped in a thick layer of bubble wrap for some extra protection. Because this is of course the highlight of this package, we impatiently pull this layer of bubble wrap from the pedals to admire what’s underneath. Underneath the plastic are 3 beautiful black powder coated pedals that make our sim racing heart beat a little bit faster. A nice detail which we notice on the pedals is that each pedal separately has a sticker that indicates that the pedal has passed the quality control. There are also some extra materials for the pedals in the box. For example, there is a small box with an Arduino controller, USB cables, a grounding cable and a few different elastomers. In addition to the box, we also find a plastic packaging with a USB cable to connect the controller to the computer.


Technique & Quality
As mentioned above, we received the Simforge Mark-1 Dark Edition. This is a pedal set with 3 pedals that come with a nicely coated baseplate. The difference with the normal Mark-1? Just the black coating applied to the profiles and corner pieces of the baseplate for an extra sleek look. The approach of the Simforge Mark-1 pedals is to give the user as much quality as possible for the lowest possible price. To achieve this, a number of choices have been made that make the Mark-1 pedals a set of unique pedals.
Baseplate
One of the first notable design choices for this pedal set is the baseplate. It is a kind of hybrid base that consists of a frame of aluminum profiles on which a heel plate can then be attached. The heel plate is a beautiful red colored plate with “Simforge” milled out on the front. This is very neatly done and it looks impressive. The only downside we can discover about this is that the tight font does create a few sharp corners that you can get stuck behind with your socks. The basic design all sounds “nice and simple” and it certainly is. But that doesn’t make it any less of a design. Because the mounting of the colored plate is done with 4 special brackets, it can be adjusted in almost every possible way. Whether you want to move the plate up, down, forward or backward or at an angle, it is all possible. This way you can always adjust the baseplate in relation to your pedals themselves, because the pedals themselves are of course also attached to this baseplate. The main part of the baseplate is a 120×40 profile of about 36 centimeters long. This means that there is also enough space to move your pedals apart for a comfortable sitting position. Because we received the Dark Edition of the Mark-1 pedals, all aluminum profiles are provided with a neat black layer of powder coating. Which in combination with the red heel plate provides a beautiful whole.
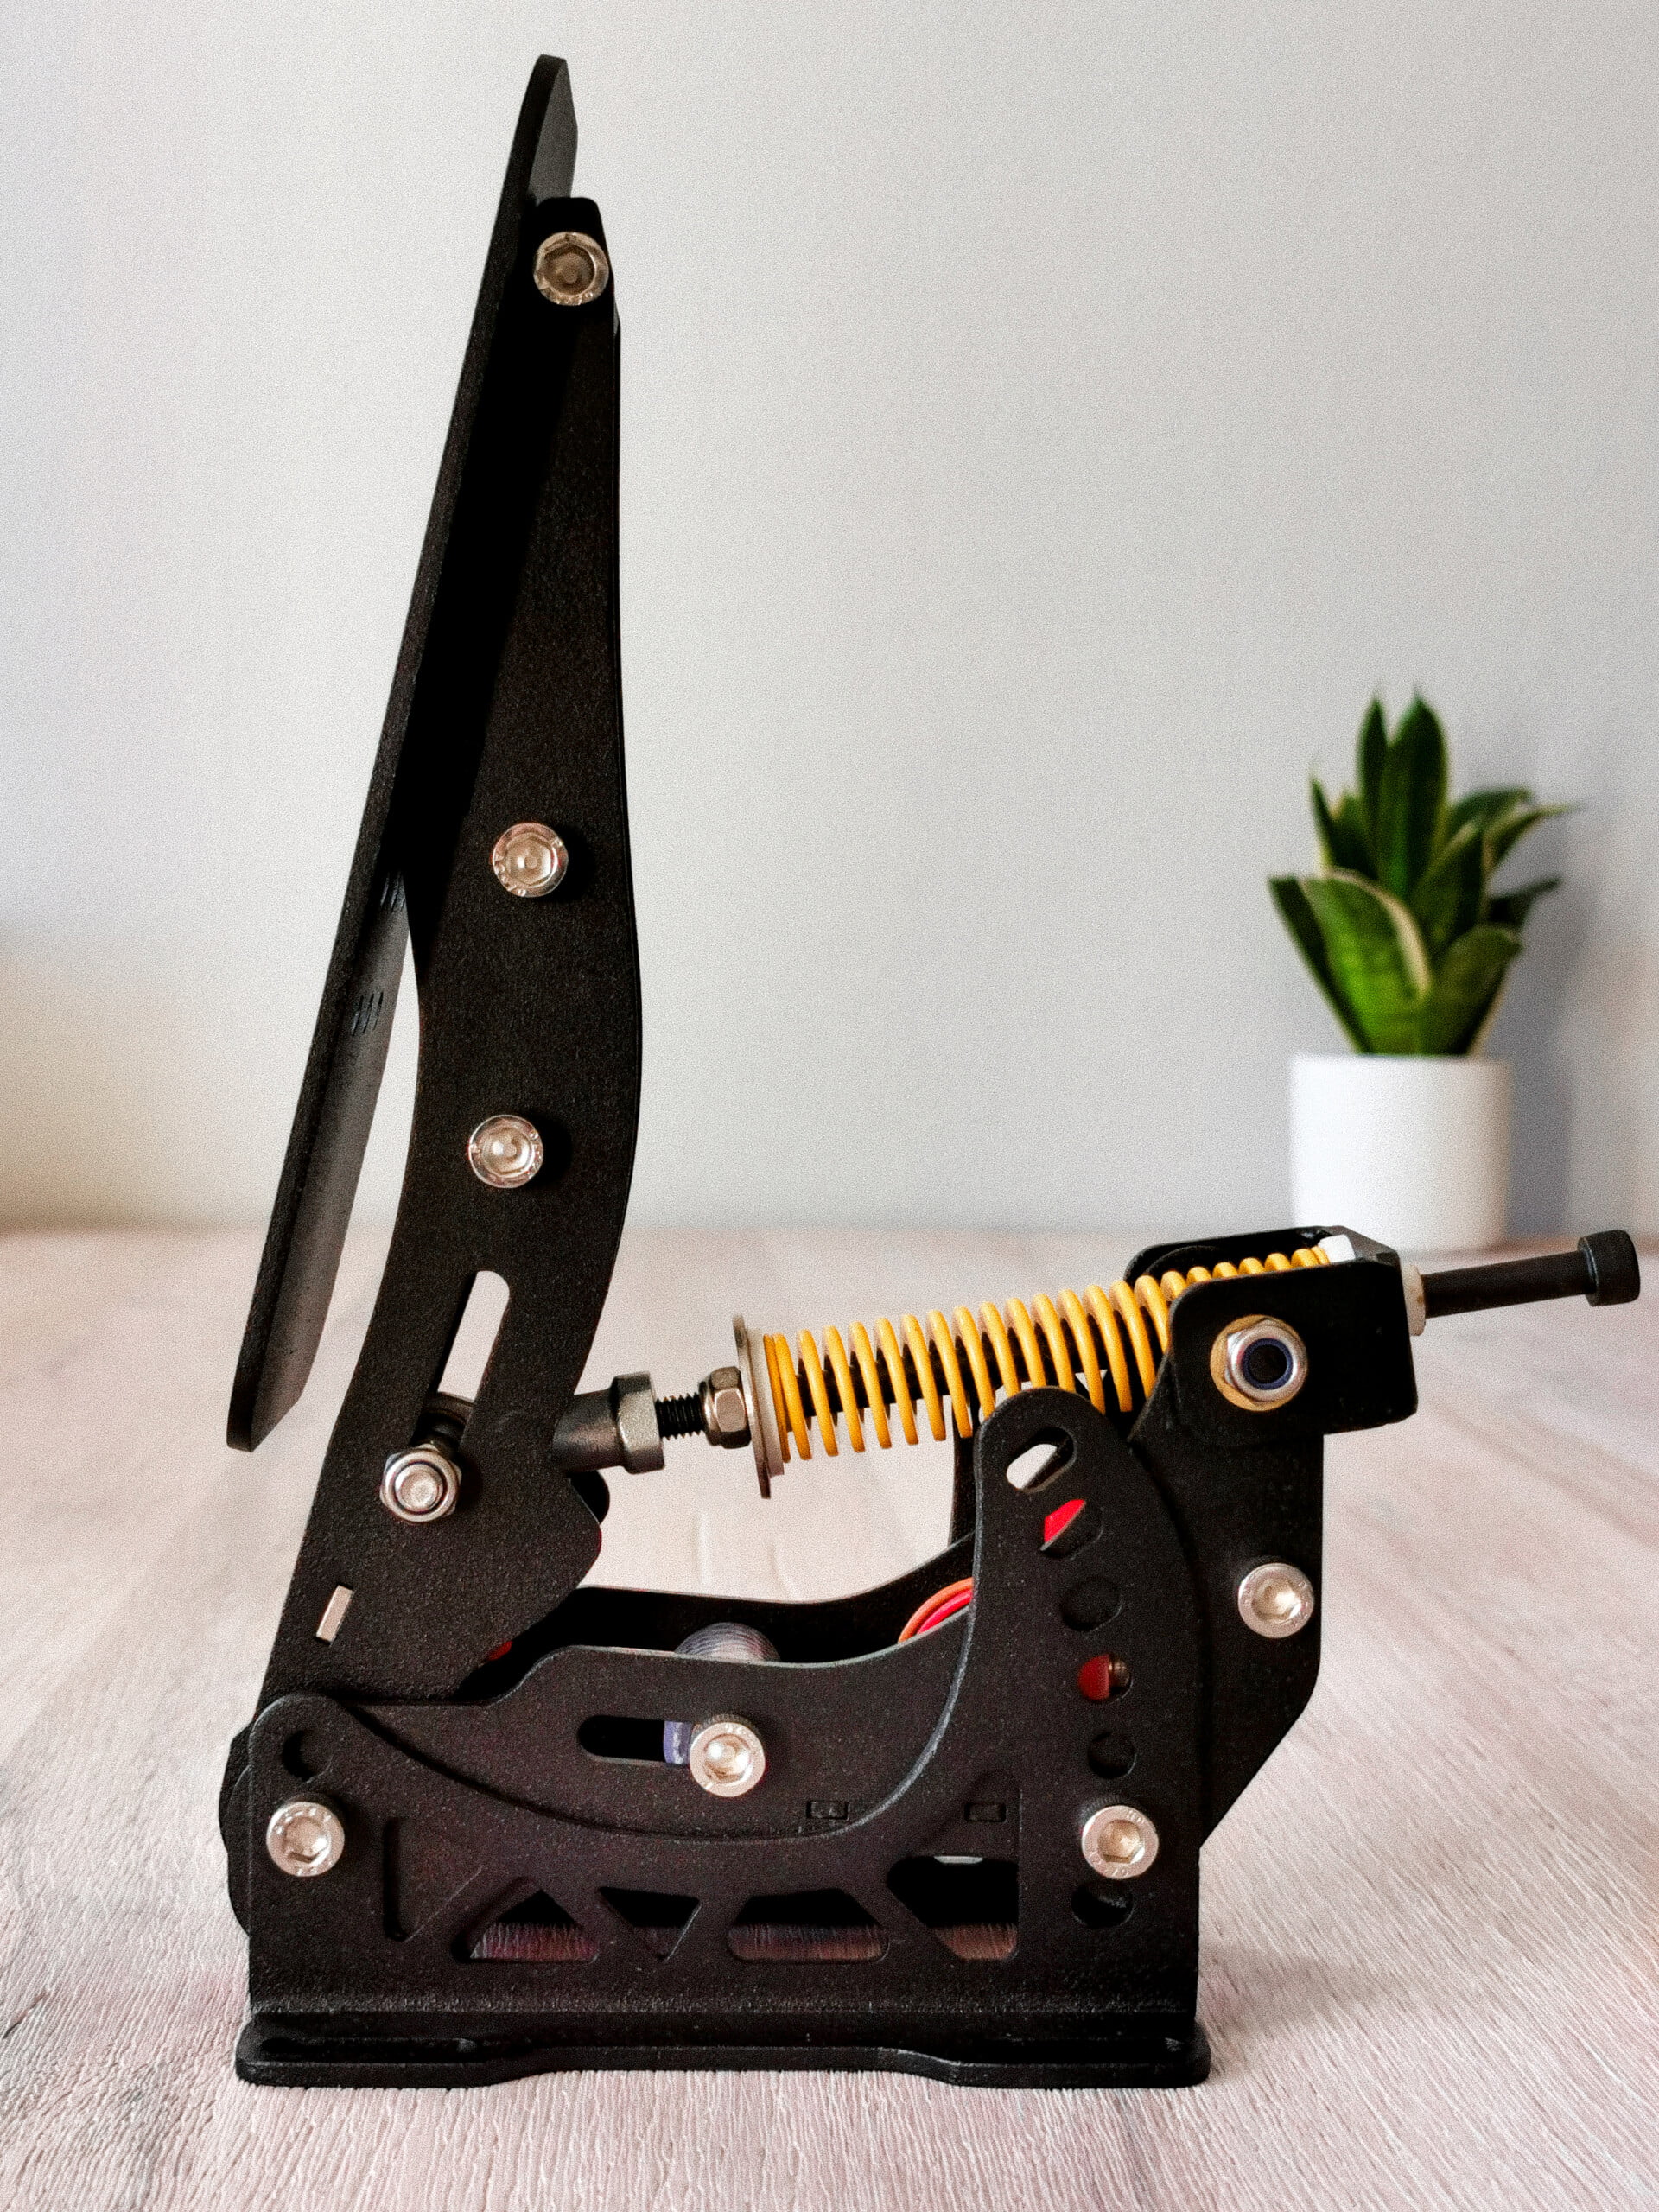
The throttle pedal
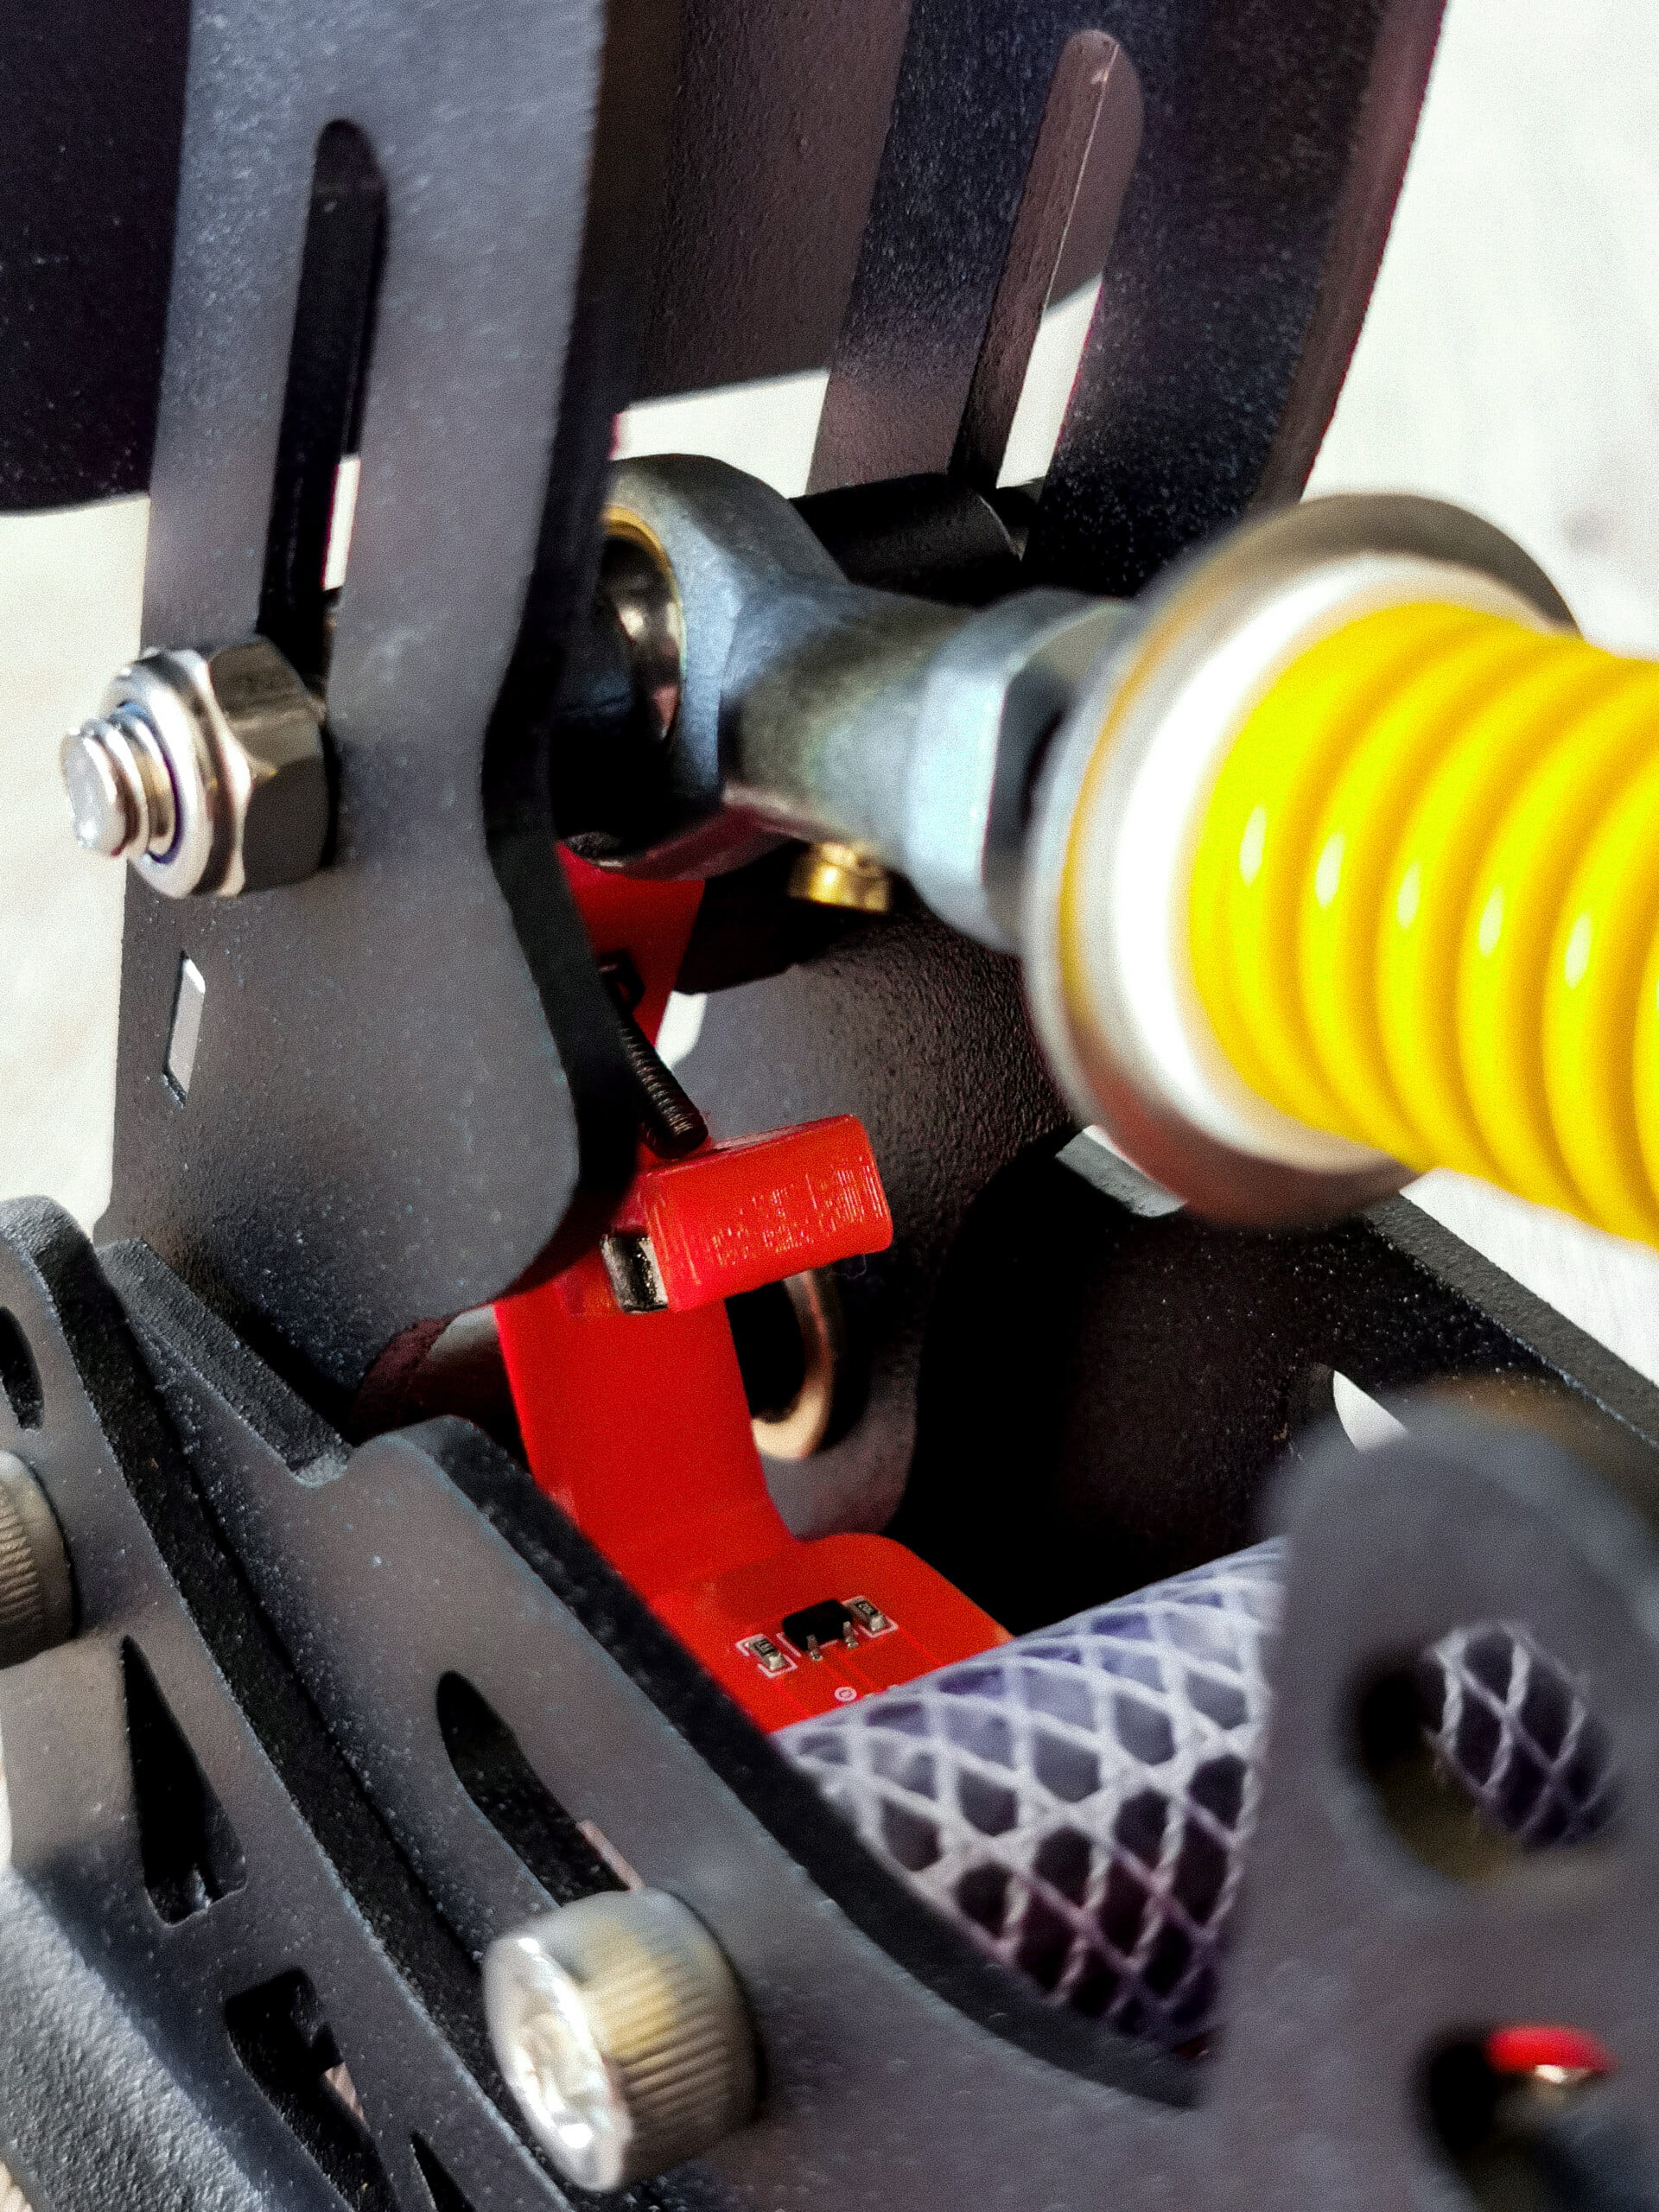
In addition to the special base of this set, there is of course also a nice set of actual pedals. The first pedal we look at is the accelerator pedal. The first thing that catches our eye when we look at the accelerator pedal is the beautiful black finish. All three pedals included with the Simforge Mark-1 are powder coated black to give them their unique look. In addition to the black powder coating, there is of course more to see on the accelerator pedal. The footplate has a specific shape where the bottom of the pedal is wider than the top, making it clearly recognizable from the other pedals. A 3×5 hole pattern also ensures that you can go in all directions with the footplate to make yourself as comfortable as possible. This footplate can be moved up and down as well as from left to right. To give the pedal a feeling of feedback, it is equipped with 1 single yellow colored spring that we encounter behind the pedal itself. To change the feeling in the pedal you can set the spring to a slightly higher preload with the screw that runs through it or you can have the spring connected to the pedal itself at a slightly different angle. There are plenty of options to adjust the pedal feeling to taste. Of course there are even more possibilities to make the pedal as personal as possible. There are also options to shorten the stroke of the pedal and to angle the entire pedal, which we really appreciate since we will be mounting these pedals on our formula rig. The most unique thing about these pedals, however, lies in the interior. The accelerator pedal works with the familiar system of a Hall sensor with a resolution of 10-bit, which is not very unique. What is unique, however, is that the sensor and the associated electronics are incorporated in parts that come out of the 3D printer. By default, these are printed in a red plastic, but Simforge has made these parts available online. This means that if you own a 3D printer, you can choose a color in which you want these parts printed for an even more unique set of pedals. In addition to having a visual aspect, it also has another advantage. If these parts are worn out, you can immediately print new parts yourself (or have them printed) and replace them in your pedal set.


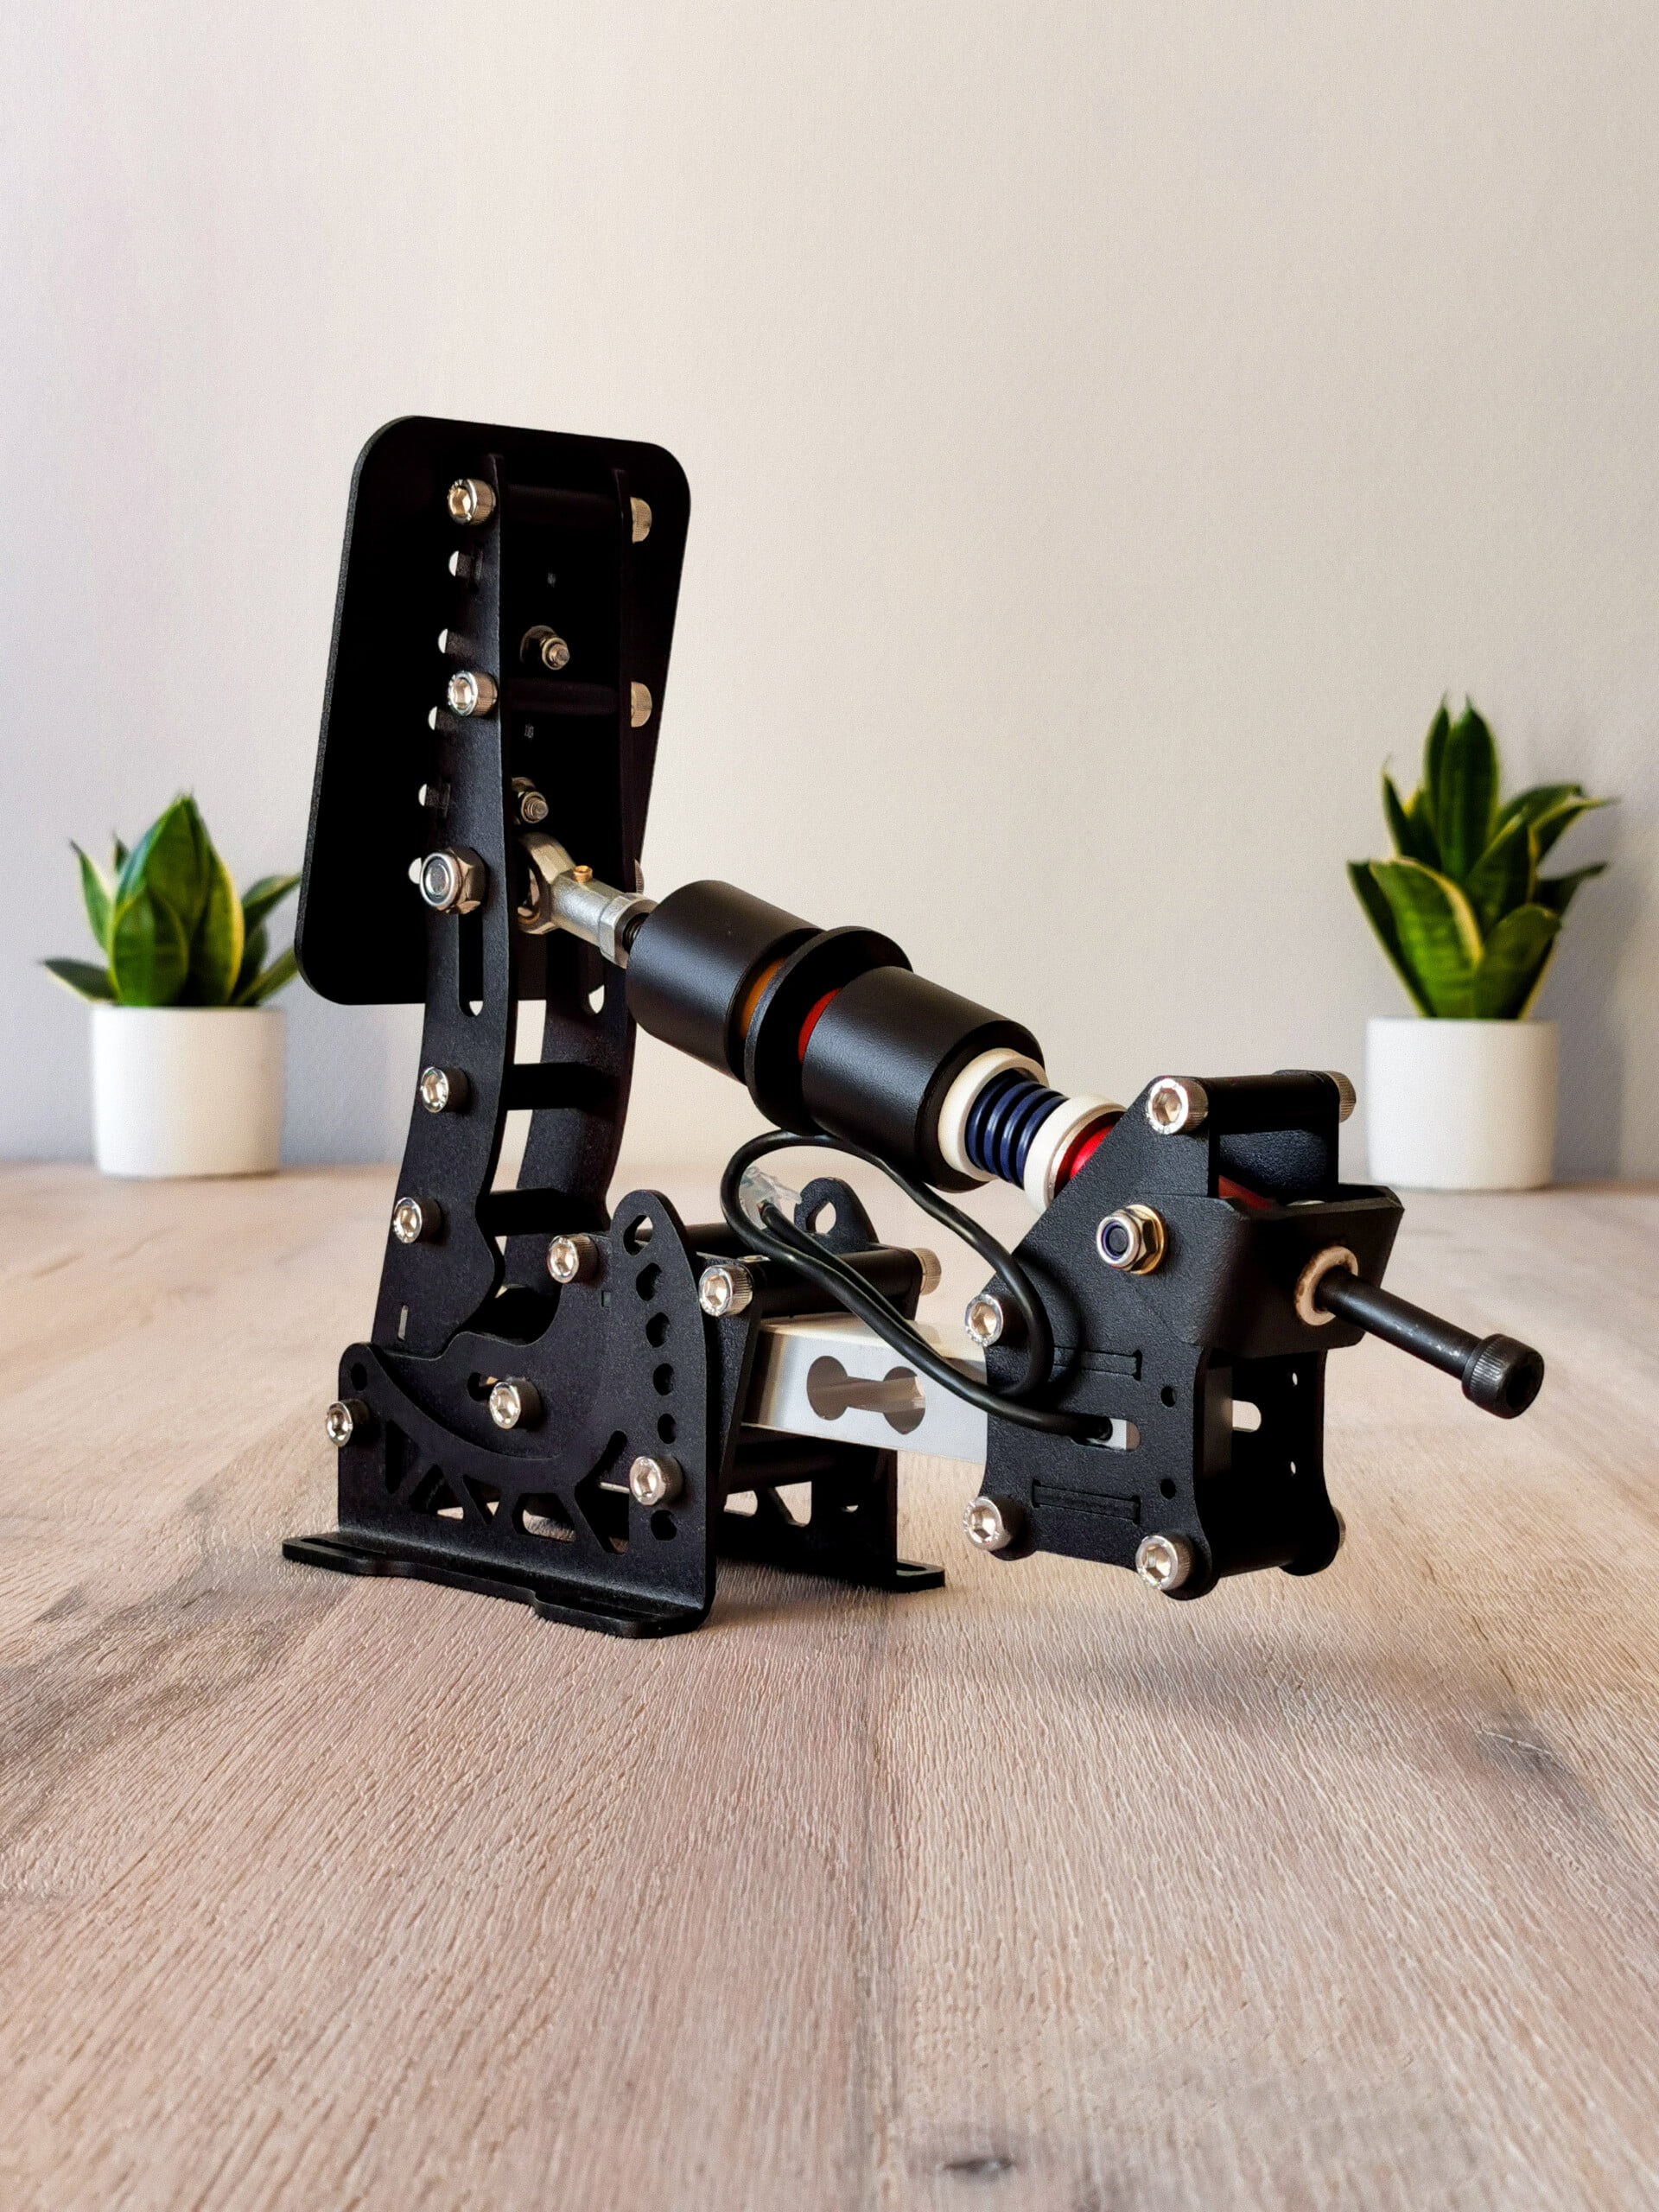
The brake pedal
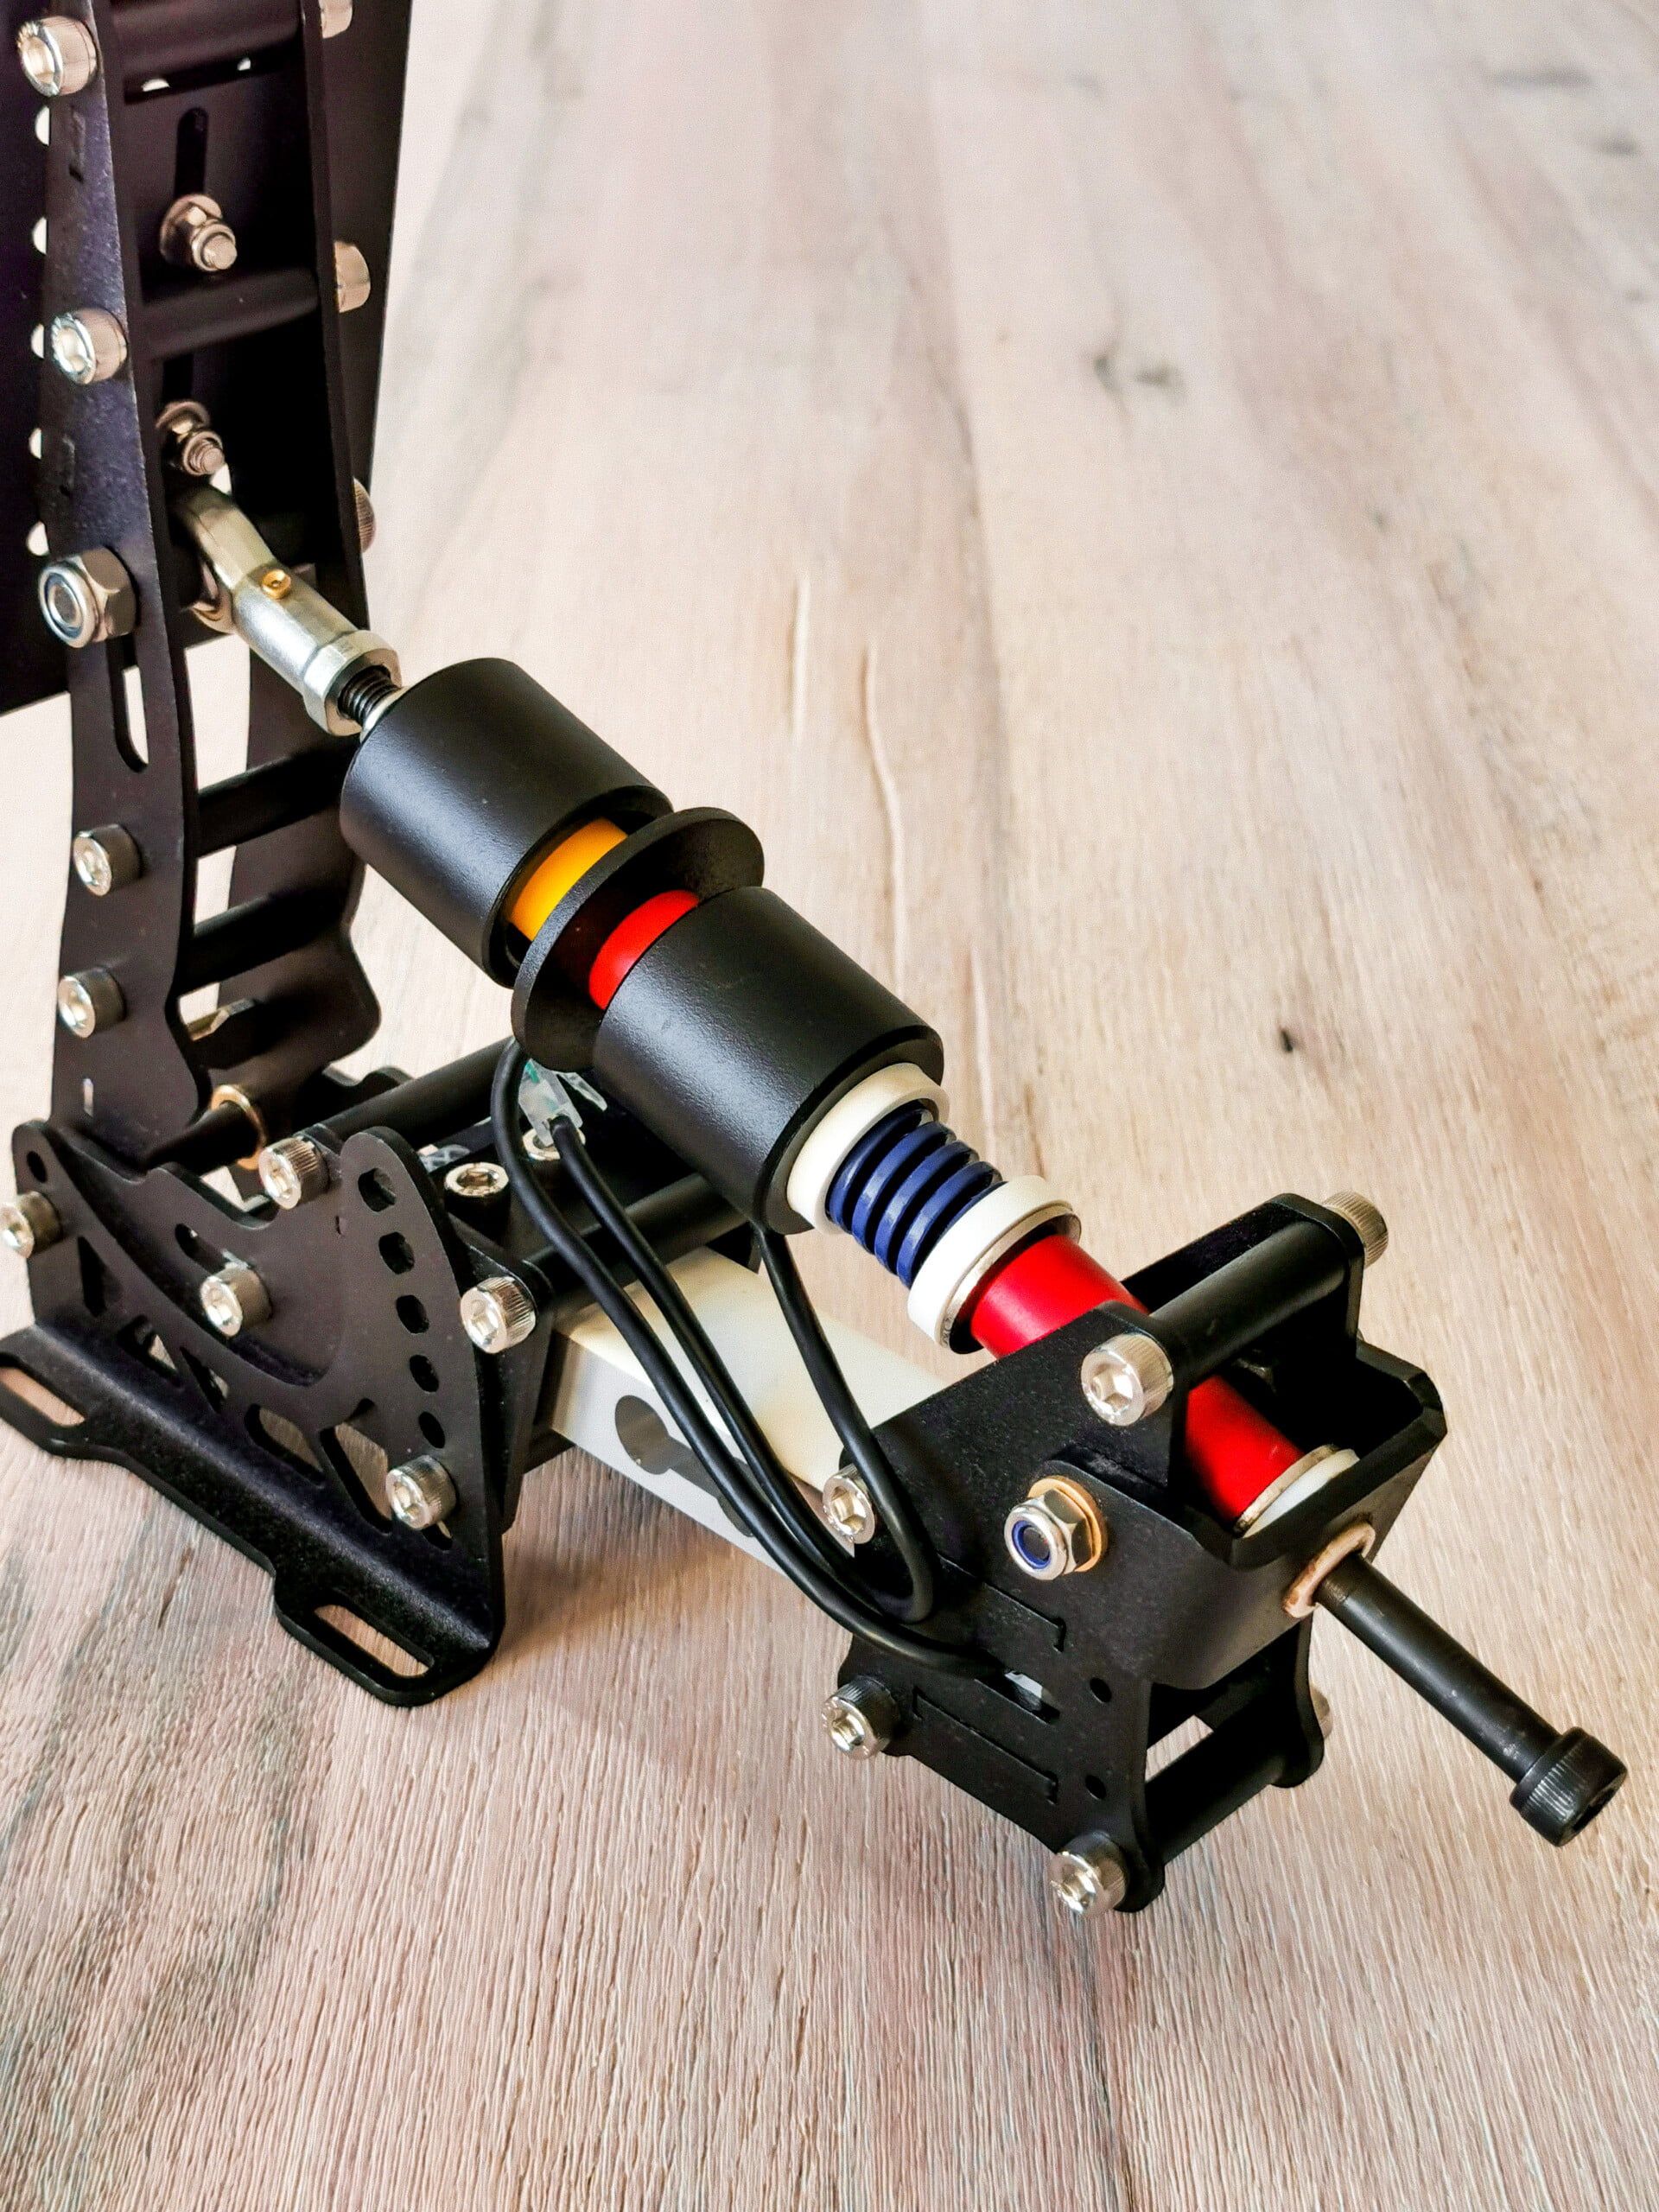
The brake pedal of the Mark-1 is a pedal that immediately catches the eye. Due to its large size, it is a pedal that looks like it can take quite a punishment, which we certainly expect from a brake pedal. This beautiful black coated pedal is also equipped with the proven systems for the higher segment of pedals. The brake pedal works with a 24-bit load cell system to convert your braking force up to a maximum equivalent of 80kg into a digital signal for your computer. A few facets are used for the feeling in the pedal. For example, there is a small linear spring for the initial brake feeling, for simulating the build-up of brake pressure, 2 elastomers are used, each of which is in its own housing. Furthermore, there are no parts on this pedal that come from the 3D printer and the load cell is neatly concealed. At the back of the pedal, 1 RJ45 plug comes out of the pedal that can be connected directly to the controller. In terms of setting options, we find almost all the same properties as with the accelerator pedal. For example, you can also move the footplate of the brake pedal, set the pedal at a different angle and, relatively unconventionally, even adjust the stroke of the brake pedal. For those who want, there is an end stop on the pedal that can be moved forward and backward to limit the maximum travel of the pedal.


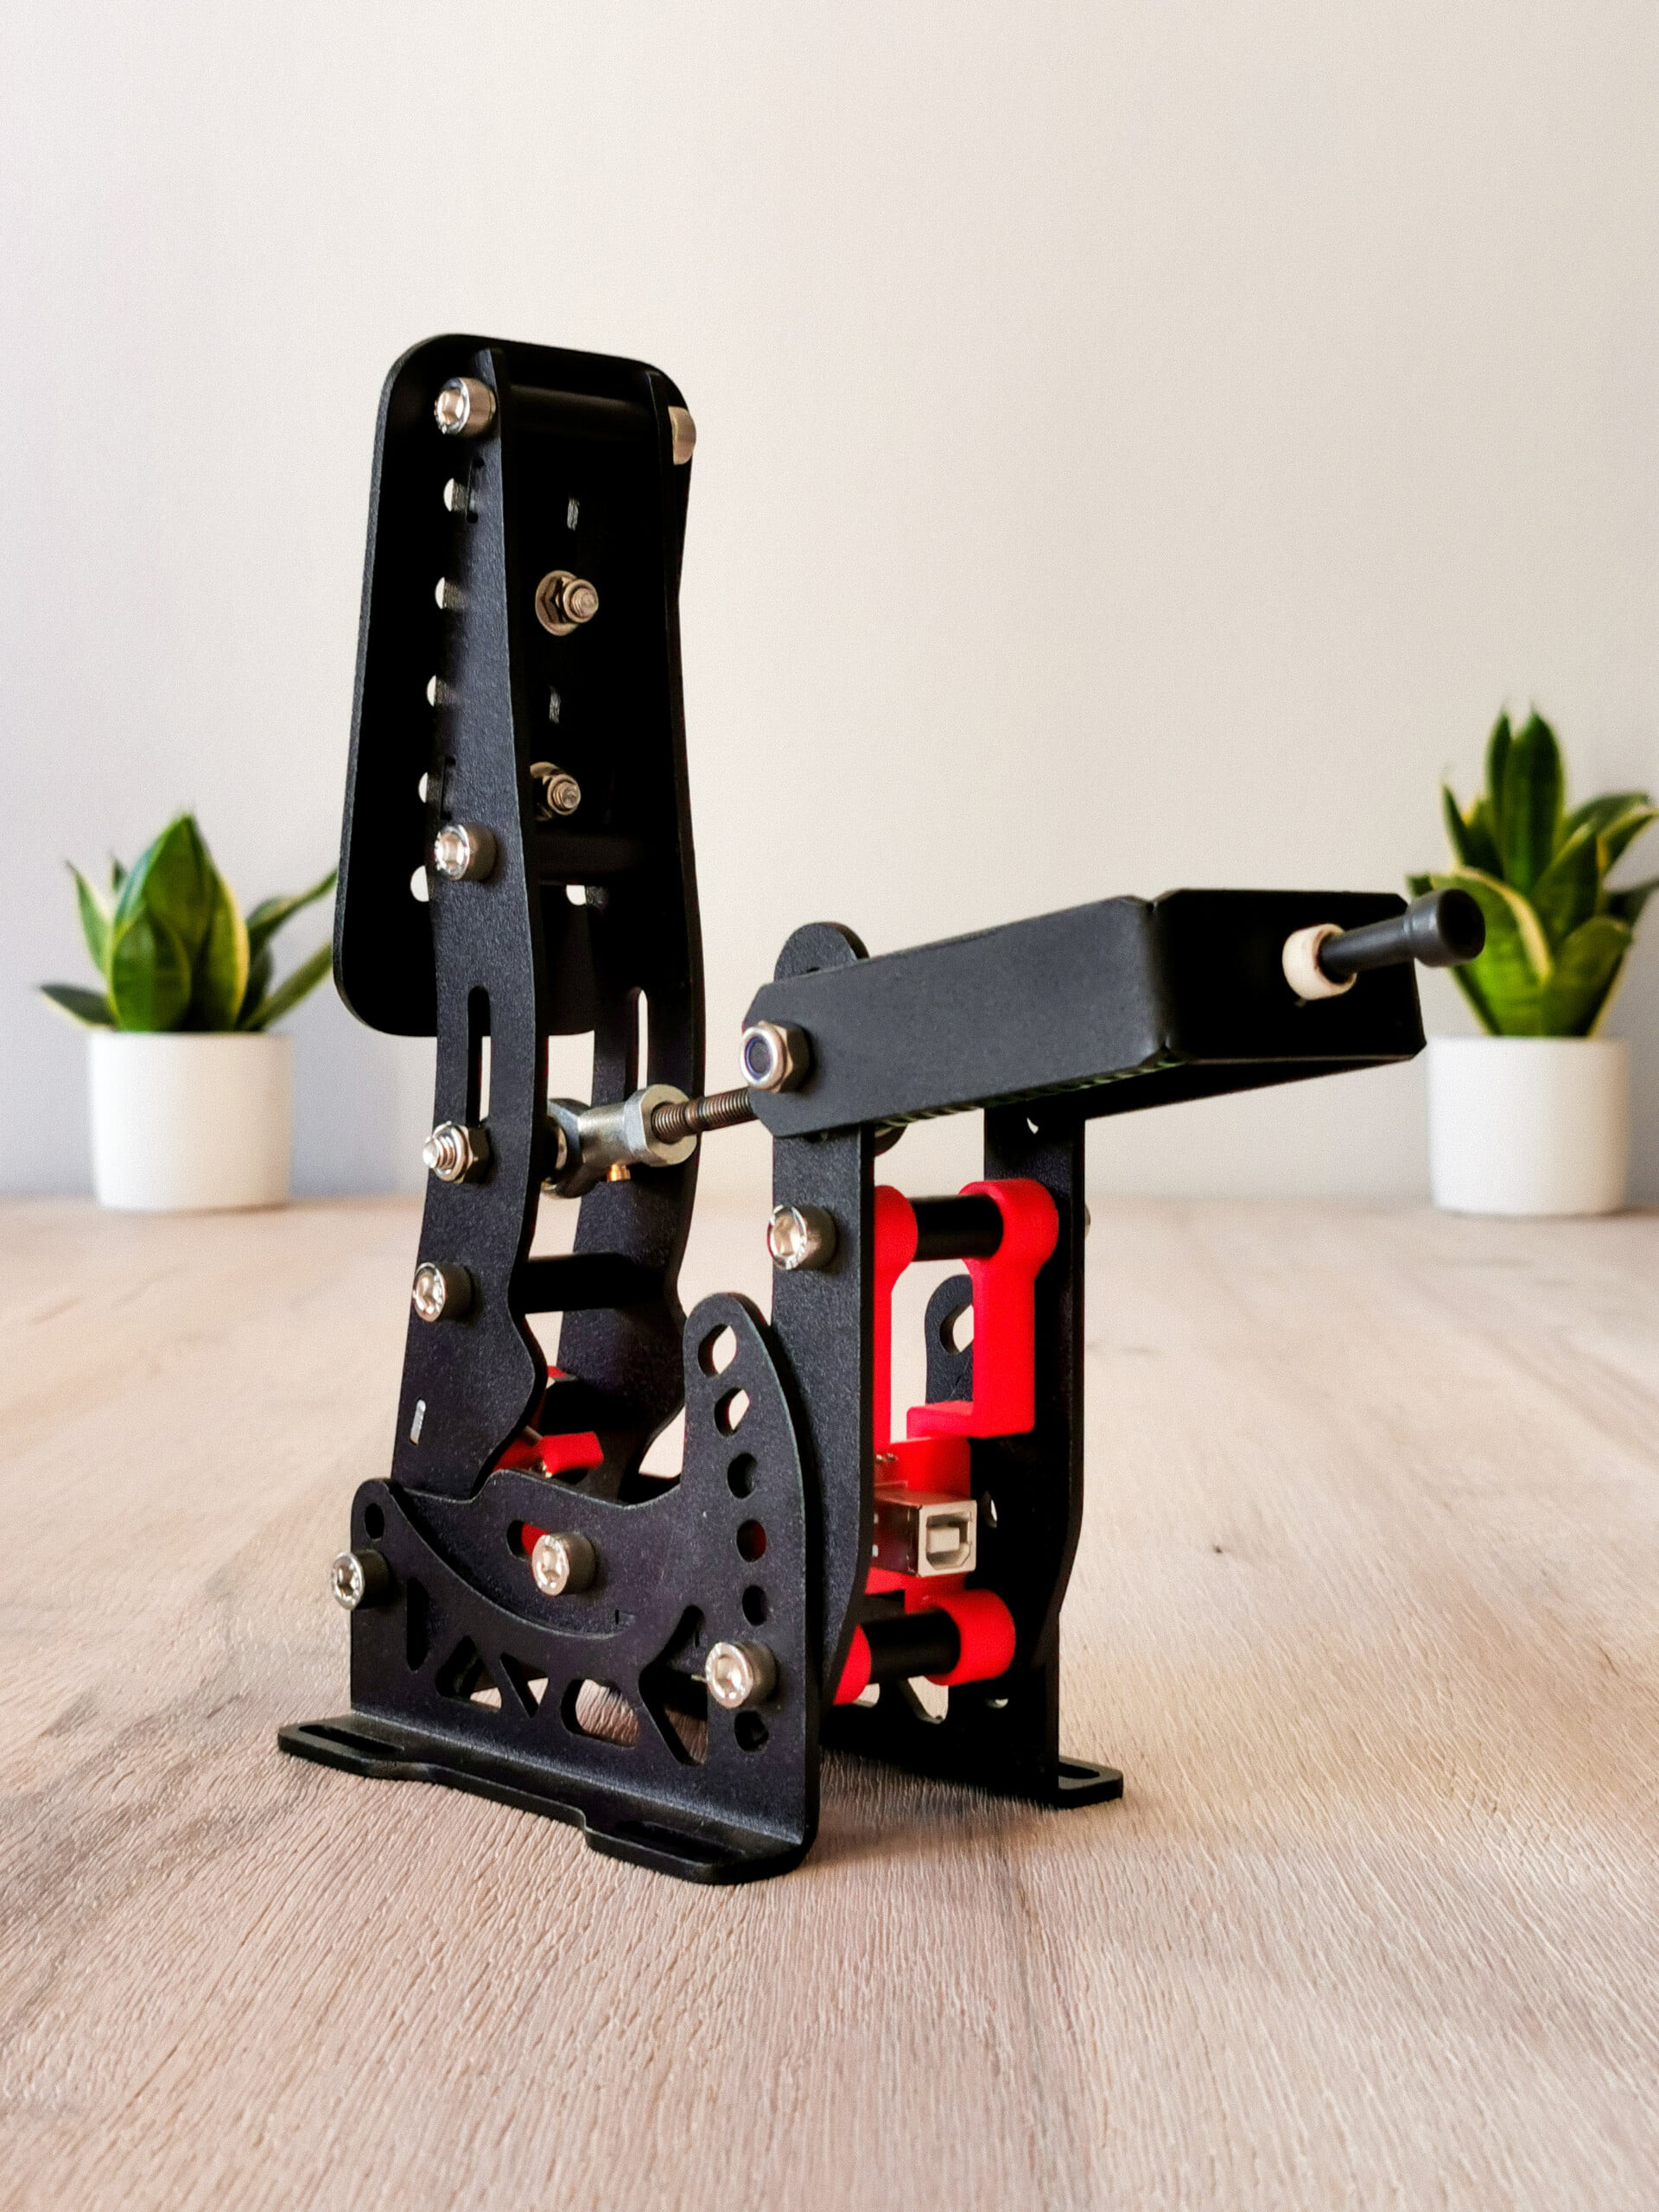
The clutch pedal
The clutch pedal is again a pedal on which we see the red 3D printed parts fitted between the beautiful black coated aluminum. The footplate of this pedal has a standard rectangular shape that we often see on other pedals and has a 3×5 hole pattern. Like the accelerator pedal, the clutch pedal uses a Hall sensor to transmit the pedal position to the computer with 10-bit accuracy. Of course, the clutch pedal itself differs from the accelerator pedal. For example, this pedal is equipped with a rocker system to simulate the engagement point of the clutch. The linear spring of this pedal changes angle as you press the pedal, the result of this is that the force of the spring does not act linearly on your pedal, so that you can push the pedal “through” the biting point of the clutch. To be able to adjust the pedal to your own preference, this pedal is also equipped with all options to change the angle, preload of the spring and the stroke of the pedal.


The controller
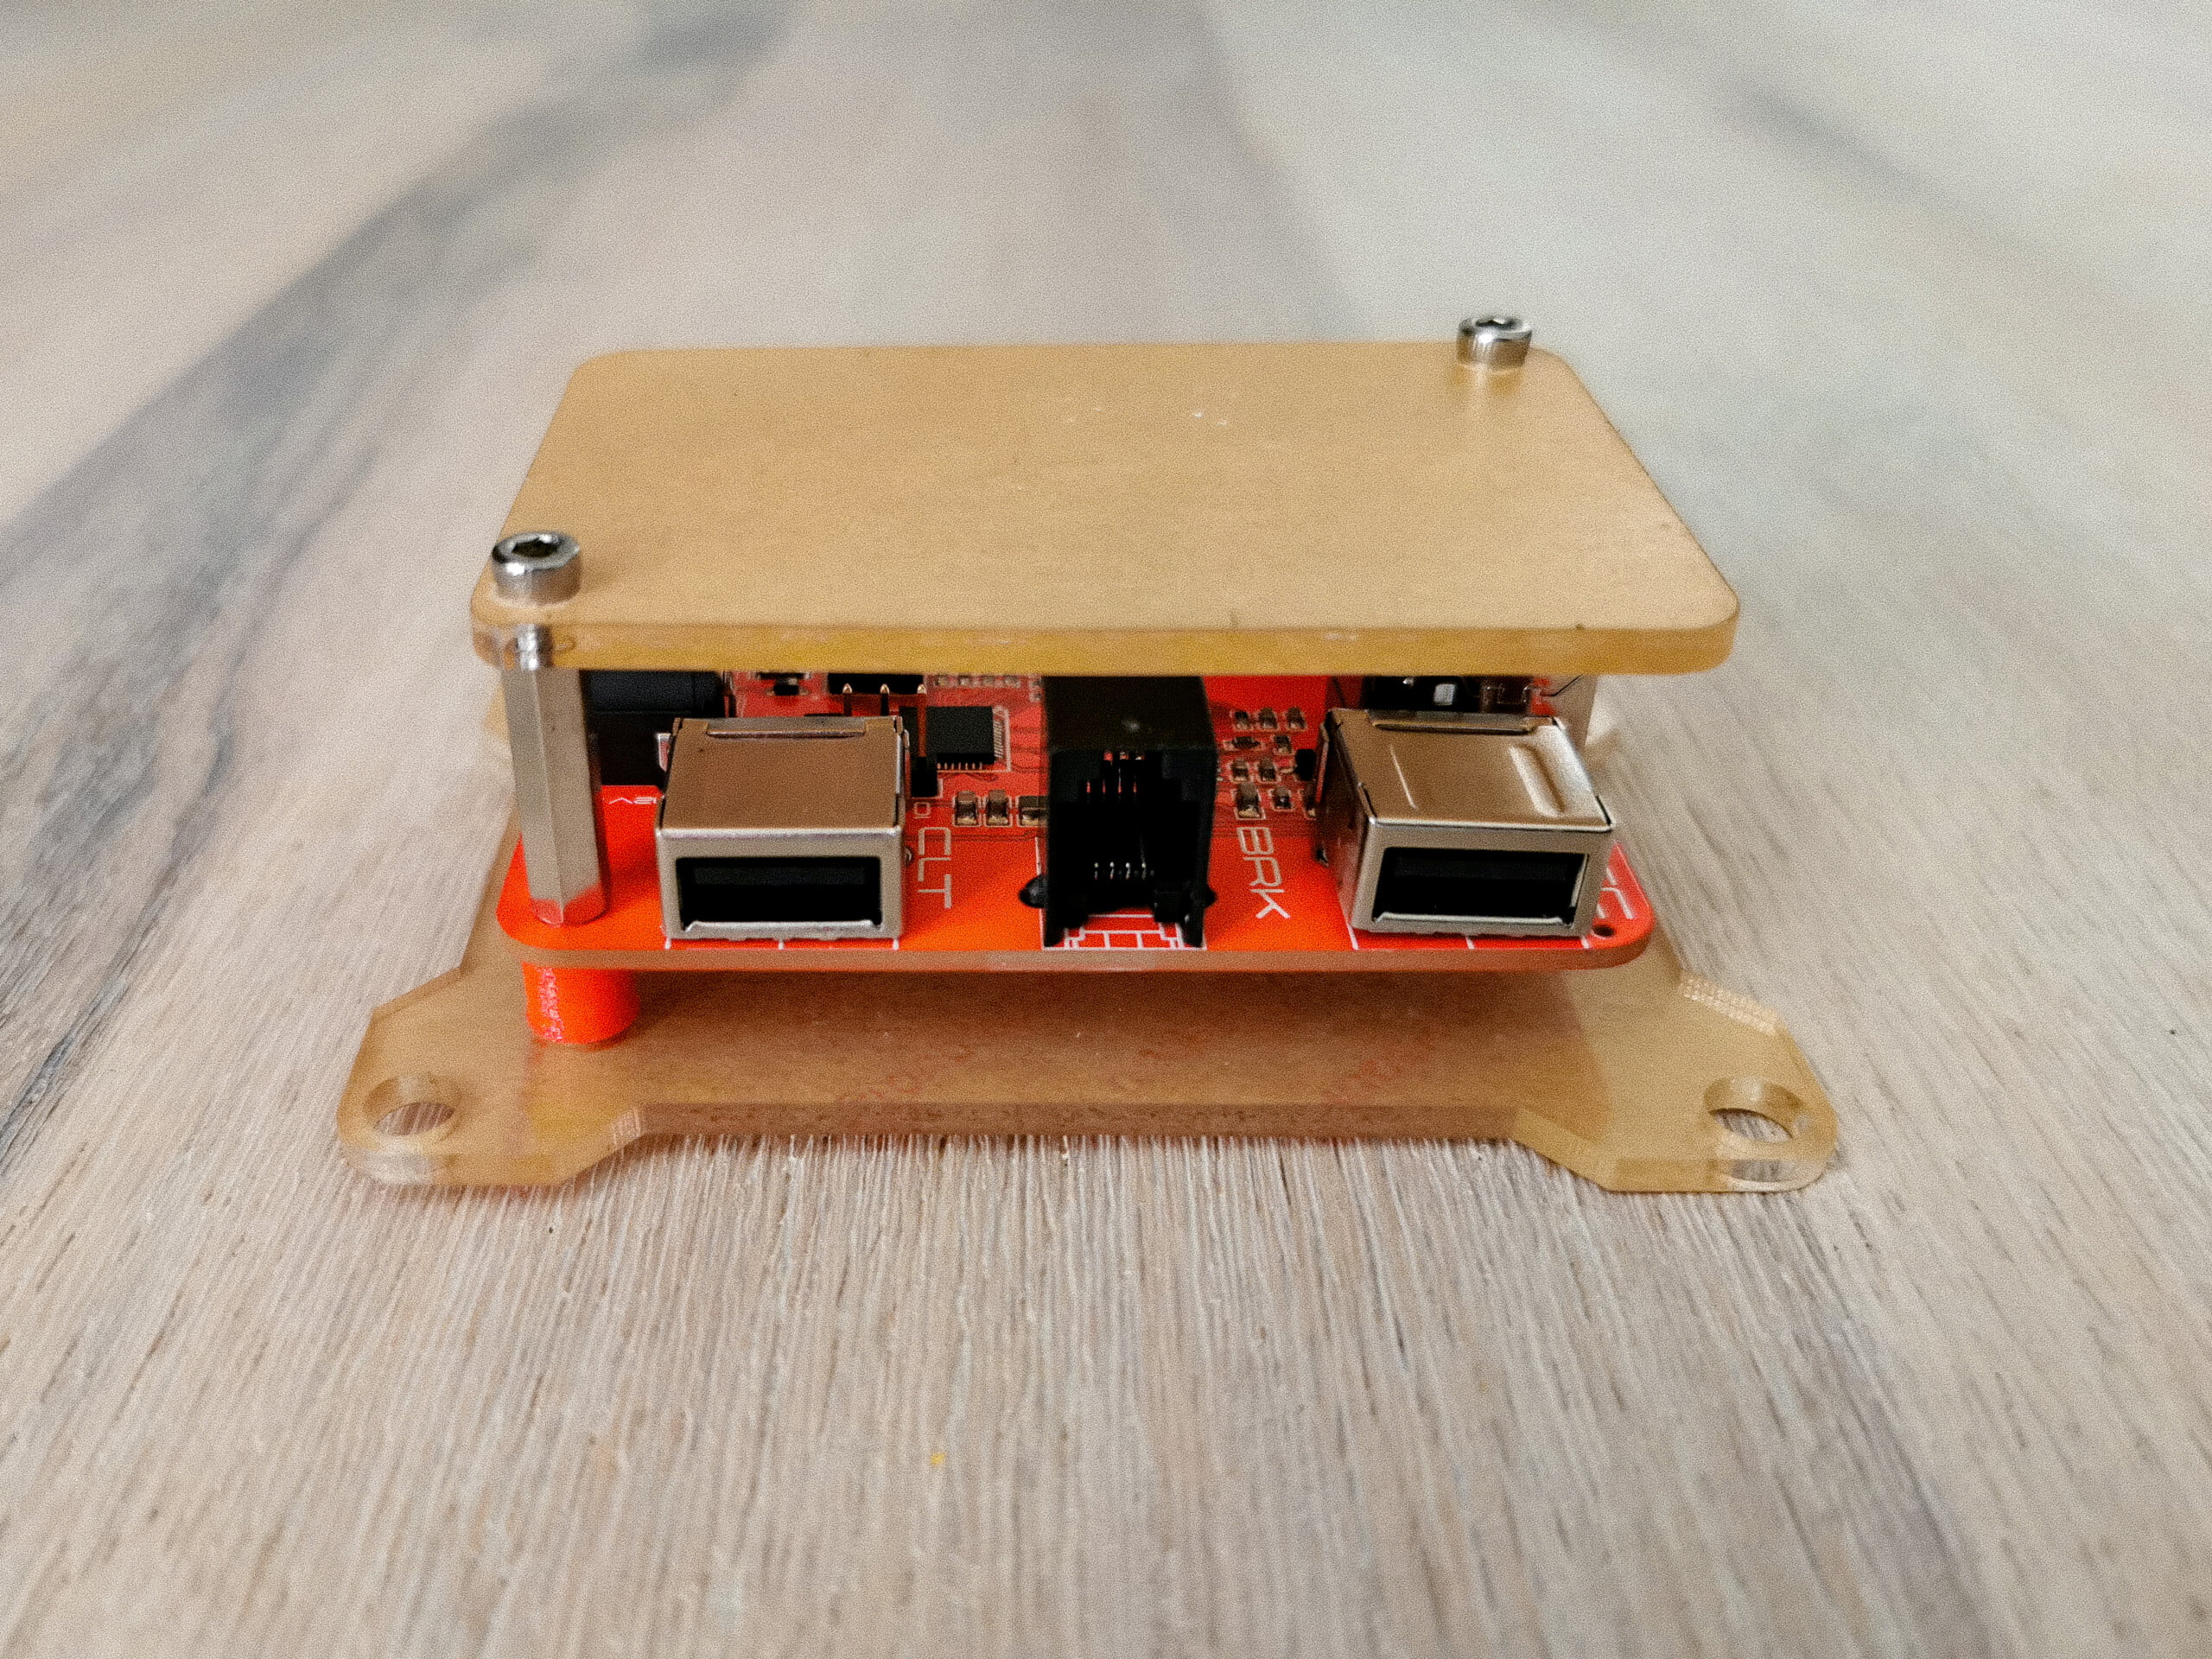
Before the signals from the pedals arrive to the computer, they are first sent to a controller which translates the signal. Simforge has chosen a small Arduino circuit board with 2 plexiglass protection plates as the controller for their Mark-1 pedals. The circuit board is equipped with 2 USB-A modules which can be connected to the clutch pedal and the accelerator pedal via a USB-A to USB-B cable. There is a different connection for the brake signal, namely an RJ45 connector from which the cable from the load cell can be connected directly to the printed circuit board. For the connection to the computer, we find a USB-B connection on the side. lastly, we find a few components on the printed circuit board for an external power supply, four terminals for wiring and a small reset button.
Mounting
As excited as a child with a new LEGO set, we are eager to put this set together. With all parts on the table in front of us and a tool kit within reach, we are ready to start assembling. However, we immediately run into a small hiccup, because there is no construction manual at all with the pedal set. Did they forget to put it in the box? No definitely not. After we contacted Simforge, we were told that this is a deliberate choice. Instead of making and printing a manual for every pedal set sold, it was decided to make an online instructional video. We think this is a good idea, bearing in mind that Simforge saves on all “unnecessary” costs. As a green extra, it is of course also better for the environment to use less paper. However, at the time of writing this video is not yet available, but in the near future this online manual will provide support in assembling the Mark-1 pedal set.
Although we already have the necessary experience in assembling sim hardware, it is a difficult job with these pedals. Due to the amount and the different types of screws, it is a lot of puzzling of what should be used where. Fortunately, the actual assembly is straight forward with the nuts for the aluminum profiles and the accompanying Allen screws. Because the baseplate of these pedals basically consists of 3 aluminum profiles, it is a matter of securing 2 corner profiles and you’re all set. Attaching the pedals themselves to the large aluminum profile of the baseplate is also a piece of cake. Each pedal has slotted holes on the corners with which the pedals can be attached in an easy and accessible way. The last step to build the pedal set yourself is to attach the beautiful red heel plate to the black profiles. 2 pairs of unique brackets are included for this, so that the heel plate itself remains adjustable after initial mounting.

With the Mark-1 pedal set fully assembled, it’s time for the next step, which would be the mounting on the pedal plate of our FSR Avanzata, which in our case consists of 2 aluminum profiles. This is the moment for us where we run into a few challenges. To be able to attach the pedal set to your simrig, four corner pieces are included. The photos on the website show that all 4 corner pieces are placed on the sides of the large profile of the baseplate. While trying, we soon find out that there is no screw thread in the sides of the profile. Simforge has abandoned this system, the corner pieces now simply have to be secured in the profile slots. While we want to fix the corner pieces to the baseplate, we come across the next hurdle, there are not enough mounting materials with the set to attach it to your rig. Fortunately, we do have a few mounting materials laying around, but for the sim racer that makes their first switch to pedals of the higher segment, this does not always have to be the case. We also find out that the standard click-in nuts that we have are too thick for these profiles, so that the lack of the latest fasteners actually turns out to be an even more serious problem. In the end we solve the problem by using thinner bolts than which were used for the rest of the connections in this set, for these bolts we had lay some smaller nuts which do fit in these profiles.
In the end, we have the Arduino controller that comes with the pedal set. The mounting materials for this controller are also missing and you will have to find a solution yourself. Something which doesn’t make things much easier is that the housing of the Arduino has 2 protruding bolt heads. That in itself is not a problem, however these 2 holes are diagonally fit in the housing, so that the controller cannot be mounted straight and must therefore be mounted at an angle.

Setup
With everything mounted on our cockpit we can move on to the next step of the installation, finetuning the Mark-1 pedals. In addition to adjusting the pedals yourself, the Simforge Mark-1 also allows you to adjust the baseplate. The adjustment possibilities of the pedals are almost endless. Because we mount the pedals on a formula style rig, we prefer it when the pedals are upright and the stroke of the pedal is nice and short so that we don’t have to over-stretch our foot. Because the basic housing of all three pedals is the same, you can neatly place the pedals at the same angle. The pedals can be placed at no less than seven different angles! That gives you enough space to find the position that suits you best. Adjusting the travel of the pedal is also a matter of loosening one screw and pushing the end stop forward before tightening it again. All pedals can also be easily moved apart by loosening the four mounting screws and sliding them to the desired position. Whether you want to go forward, backward or sideways, it’s all possible. Because both the pedals and the baseplate have a black coating, we are very careful with sliding. This is because we don’t want to scratch our brand new pedal set. Fortunately, after sliding up and down, we have not yet been able to discover any scratches in the coating, which gives us a good feeling! Because nothing is more annoying than immediately damaging your newly aquired items.

With all the pedals in the right place, we can move on to the next step, the pedal feel. Because we can appreciate a somewhat heavier accelerator pedal, we also want to give this accelerator a little more resistance. The Mark-1 has two different options for the accelerator pedal. With the long black screw protruding from the back you can set the preload of the spring a little higher. For our feeling, the accelerator pedal is still a bit too light. By changing the angle of the spring relative to the pedal itself, the spring of the pedal can provide some extra resistance. However, adjusting this angle does not go without a hitch for us. After loosening the bolt, we try to place the spring a little further up. However, the shaft that needs to be pushed up seems to be almost stuck. With a little more force than we actually want to apply, we manage to get from the bottom of the adjustment slot to halfway through the slot. Fortunately, this has the desired effect, so that the pedal now feels completely as desired.

The brake pedal actually feels good to us straight out of the box. Of course, this does not alter the fact that this pedal can also be adjusted to get the desired feeling. The pedal contains two different elastomers as standard, namely a yellow (medium) and a red (hard). By loosening the black screw that goes through the heart of the assembly, the brake pedal axle can be unstacked one by one to replace the elastomers. Four other elastomers are included in the box, these are an extra red, an extra yellow and two black (soft) elastomers. By exchanging and combining the elastomers you can determine the resistance of the brake pedal yourself. Nothing is mentioned with the use of 2 different hardnesses about a possible order of replacement, therefor we assume that the order makes no difference for these pedals. You can also make the play in your pedal a bit more or less through the middle of the black screw through the heart in order to create a somewhat tighter or looser feeling in the brake pedal.
The clutch pedal also has the necessary options to adjust the feel to personal preference. Similar to the accelerator pedal, the clutch pedal can adjust the preload of the spring and the angle at which it exerts its force on the pedal itself. As an additional adjustment option, it is also possible to slightly adjust the height of the rocker system of the clutch. In this case, with a higher position of the rocker system, the bite point of your clutch will be deeper and with a lower position you will have to press the pedal less far to reach the bite point.
A small footnote when adjusting these pedals is that this is not done without tools. Also, not all screws that are used require exactly the same tools. It is therefore advisable to have an Allen key set and a set of open/ring wrenches at hand when you are working on this.
Software
The last steps before we can start racing with our Simforge Mark-1 pedals are installing the software and calibrating the pedals.
At the very bottom of the Simforge website is a “Manual & Drivers” section. This links you to Simforge’s Dropbox where the necessary drivers and calibration software can be downloaded. Fortunately, the instructional video for the software is already ready and will guide you through the installation process without any effort. There is also a video available for the calibration of the pedals that guides you through all the steps to calibrate your pedals.
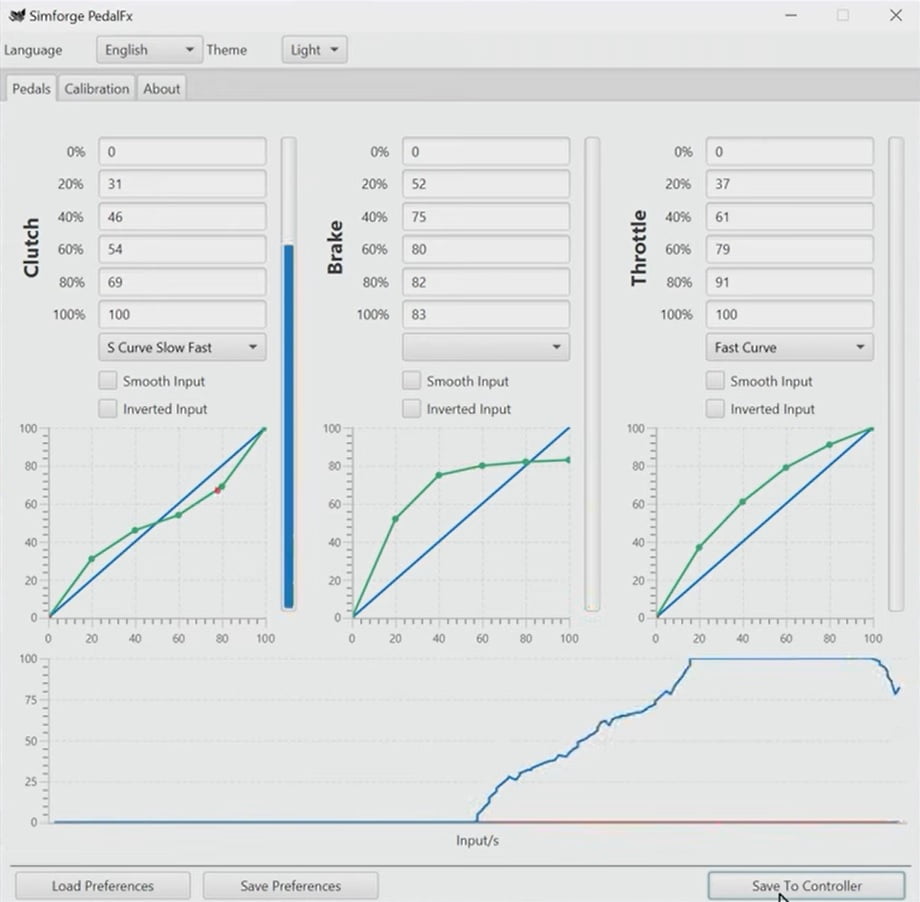
The software itself is relatively simple software with no visual frills and it does exactly what it is supposed to do. What the software is extensive in is the choice of languages. The software has the option to be set in 9 different languages. The software has two interesting tabs used for calibrating the pedals. In the first tab called “pedals” you can view the current pedal input and also adjust the linearity of your pedal input. You can choose from a number of standard presets or you can give each point a specific value. The second tab “Calibration” is the tab where you perform the actual calibration. The tab seems a bit complex due to all the information displayed, however, calibrating the Simforge Mark-1 pedals is literally as simple as pressing start, fully pressing and releasing your pedal and clicking next twice. Just save your calibration at the bottom and you’re done! The raw minimum and maximum values of the pedal are then displayed below the blue and red bars respectively. Where the thick bar shows the current input of the pedal with colored stripes where the calibration values are located, you can set your lower and upper deadzone in the 2nd bar underneath it by dragging the dots to the left or right. The values of the deadzone can be read under the green and yellow line and are also displayed with a line in the 1st bar.

The Use
With everything ready to go, it’s time to use the pedals for what they were meant for, racing! To test these pedals we mainly drive in Assetto Corsa and Assetto Corsa Competizione. In both games, when mapping our pedals, we see that the accelerator pedal at maximum pressure indicates 95%, while in the calibration software it goes up to 100%. Fortunately, this can be corrected in game by setting an upper deadzone of 5%. We don’t know whether this is due to an error on our computer or an error in the software, but we would like to mention this solution in case anyone needs it.
With all in-game settings ready to go, we will make our first meters on the virtual circuit. From the first few rounds we notice how comfortable this pedal set is. Each pedal moves wonderfully smoothly when pressed and the feedback we get from the pedals also feels natural. We also do not feel any accidental friction or scraping parts in the pedal. This also has the advantage that no strange noises come from the pedal during use, making it relatively quiet pedals. With full confidence we can give the pedals a good beating without having to worry about damaging anything. Despite being very solid and robust pedals, they feel very refined. What we also experience as a big plus because we are real sock racers, is that the pedals feel very comfortable underneath your feet. Where some pedals can feel a bit rough underneath your foot, this is absolutely not the case with the Simforge Mark-1. Because the footplates have a relatively large size, the pressure is spread more over the bottom of your foot, which gives a very comfortable feeling.
When used, the accelerator pedal does exactly what it is supposed to do. While driving we notice that the tension on the accelerator pedal is just right as we want and we experience a very nice feedback. We experience both the resistance and the end stop as very solid. However, the footplate for our large feet with shoe size 45 is a bit too low in our opinion. With a socket wrench 8 and Allen size 3, the foot plate is moved in no time and it is perfectly fit in relation to our foot again. The pedal feels very good after the adjustment and we can therefore drive for hours without any problems. We do have one small comment for use in a formula position, even at the shortest position, the stroke of the pedal is actually slightly too large in our opinion and full throttle is just at the point of overstretching. However, this is something that can differ per person, but also something that does not bother you in a “normal” sitting position instead of a formula position.
The brake pedal feels very good from the first moment. The feeling in the pedal feels somewhat soft but natural with the yellow / red elastomer combination. The feedback in the pedal also remains very constant with every braking movement. Because we are curious about the difference between the elastomers, we decide to use 2 elastomers of the hardest variant for our rig. In a relatively short time we replace the yellow elastomer with the red one and tighten the central screw slightly to put the whole system under a small pre-tension. The result was a nice hard pedal with a direct feel. Due to the short linear spring in the system, the pedal continues to have a small stroke, with the result that the build-up of the brake pressure continues to feel natural, even at the hardest setting. Due to the large footplate, the pedal at its hardest setting remains remarkably comfortable even after long sessions (in socks), something that we certainly appreciate.
Although the clutch pedal is the least used pedal in our case, we want this pedal to feel its best on our rig. Basically, the pedal feels like it doesn’t actually need that much adjustment. After the necessary number of test starts, it becomes clear to us that the engagement point of the clutch is still a bit too deep for our comfort. By moving the rocker system down a hole, this point comes a little further forward and we can shorten the stroke of the pedal by moving the rubber hose-encased end stop slightly forward. This makes the pedal feel a lot better. Just recalibrate in the software and we have a nice clutch pedal mounted on our rig again.
Conclusion
The Simforge Mark-1 Dark Edition are beautiful pedals to see. The black coating and the red accents make this pedal set a beautiful whole. At the moment, the lack of a manual is a loss, but fortunately the gentlemen of Simforge are already working on this and we are confident that it will become clear enough for a flawless installation of the pedals. Something that we do see as a more serious defect is the lack of mounting materials. We believe that a pedal set should have enough materials for both assembly and mounting the set on your simrig. Fortunately, this is a problem that should be easy to solve and it does not detract from the product, because the product itself is very nice to use in our opinion. It is a nice pedal set that you can comfortably race with for hours in your simrig. We also think the ways to save the costs and keep the product as affordable as possible is a great concept. The Simforge Mark-1 pedals are in our opinion pedals that live up to their motto and give you a nice “bang for your buck”.
Fortunately, keeping the pedals affordable has not come at the expense of the quality of the pedals. The aluminum parts feel very solid and look very slick with the black coating. The pedals also all feel solid and, thanks to the familiar techniques (Hall sensor, Load cell), there is actually nothing to criticize about the operation of the pedals themselves. They do exactly what they are supposed to do and they do it well. Each pedal feels smooth and comfortable to use, even with prolonged use. There is also no shortage of adjustment options. All pedals are fully adjustable and can be easily adjusted to suit everyone’s preference. This requires the use of different types of tools, so it is advisable to keep a set of Allen and spanners/ring wrenches on hand during the first few days of use. We also see making the 3D printable files available as a unique point and a great advantage, both for nice personalization and for replacing worn parts.
Bottom line, we think we can best describe the Simforge Mark-1 pedals as a diamond in the rough. The pedals are very nice to use, but there are a few things that could be fine-tuned to take the whole experience to a higher level.
Would you like to get your hands on a set of Simforge Mark-1 pedals after reading this review? Then you can order a set from the Simforge webshop from €281.05. The Mark-1 Dark Edition as we reviewed it is available from €398.00 excluding shipping and import costs.
Do you want to stay informed about SimRaceBlog content, news, announcements and (future) give-aways? Follow us on Instagram @simraceblognl and/or our Discord channel.